
Wall support and tactile feedback
The wall gives you an external reference for balance, body position, and pressure. That feedback can make it easier to notice when you shift, rotate, or lose contact during a movement.
A scannable lookup for Wall Pilates moves, muscle targets, setup, form corrections, regressions, and progression cues.
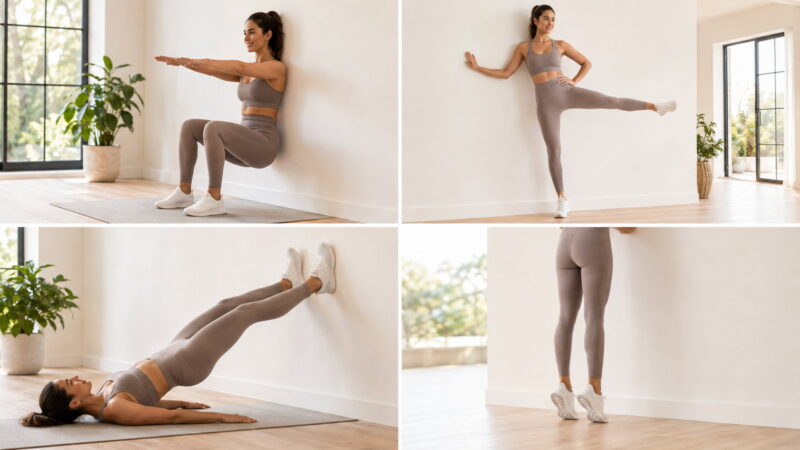
Wall Pilates is Pilates-style strength, control, mobility, and balance work that uses a wall as a support surface, alignment reference, leverage point, or source of adjustable resistance. The wall changes how an exercise is organized; it does not create a separate physiology from other forms of controlled resistance exercise.
Use this reference when you need to identify a movement, check what it primarily trains, or troubleshoot setup before choosing a routine. It is intentionally organized as a movement lookup rather than a prescribed workout, so readers can select exercises by goal and ability without duplicating the beginner or 28-day plans.
Use this map to move through the concept in a clear order: meaning, mechanism, use, and wider context.
A Wall Pilates exercise chart is most useful when it does more than name movements. You need to know what each exercise is trying to train, where the wall should make contact, what a good repetition feels like, and when to shorten the range or choose an easier version.
Use this page as a lookup reference before or during a session. It is not a prescribed workout order. Select movements that fit your current ability and the goal of your session, then use the form and progression notes to adjust them.
| Exercise | Primary target | Main wall role | Key form cue | Beginner adjustment |
|---|---|---|---|---|
| Wall-supported squat | Quadriceps, glutes | Back support and position feedback | Keep feet stable and use a depth you can control | Use a shallower squat |
| Wall calf raise | Calves, ankle control | Balance support | Rise and lower without rolling the ankles outward | Use more hand support |
| Standing side leg lift | Hip abductors, balance | Balance support | Keep the torso quiet rather than chasing leg height | Use a smaller range |
| Supported split squat | Quadriceps, glutes, hip control | Balance support | Keep both feet stable and descend only as far as you can control | Shorten stance and depth |
| Wall push-up | Chest, shoulders, triceps, trunk | Inclined resistance surface | Keep body long and shoulders away from ears | Stand closer to the wall |
| Incline wall plank | Trunk, shoulders | Inclined support | Maintain a long line while breathing normally | Stand closer to the wall |
| Wall bridge | Glutes, hamstrings, trunk | Foot support and leverage | Lift through the hips without turning the top into a back arch | Use a smaller lift |
| Wall leg press or slide | Legs, trunk control | Foot support and resistance | Move only as far as the pelvis and ribs stay controlled | Shorten the leg range |
| Wall-supported tabletop leg movement | Abdominals, hip control | Foot or leg reference | Keep breathing and avoid excessive lower-back arching | Move one leg at a time |
| Wall hamstring bridge variation | Hamstrings, glutes | Foot leverage | Keep even foot pressure and controlled hip lift | Bring feet to an easier position |
| Wall-supported knee drive | Hip flexors, balance, trunk | Hand support | Lift the knee without leaning the torso backward | Keep toes lightly on the floor |
| Wall shoulder slide | Shoulder mobility and control | Alignment feedback | Move within a comfortable range without forcing the arms flat | Reduce range |
The wall can do four different jobs: provide balance support, give tactile feedback, change leverage, or provide a surface to press against. The correct distance depends on which job the wall is doing.
For standing exercises, start close enough that you can reach support without leaning or twisting. For wall squats, the feet usually need to be far enough forward that the knees and ankles can bend comfortably without the feet sliding. For wall push-ups and planks, stepping farther away increases the incline and generally increases the challenge.
For floor-based work, adjust the distance so the feet can remain stable on the wall while the pelvis stays controlled. If you have to over-arch the lower back, lock the knees, or press so hard that the feet slip, change the setup.
Use a stable floor and a clear wall. Stop or modify the exercise if you develop sharp, radiating, worsening, or destabilizing pain, significant dizziness, or loss of balance. The wall can provide support but cannot eliminate every exercise risk.
Targets: quadriceps, glutes, trunk stabilization.
Setup: Place the back against the wall and walk the feet forward until you can bend the knees without crowding the ankles. Keep the whole foot stable.
Movement: Slide down through a controlled range, pause briefly if comfortable, then press through the feet to stand.
Watch for: knees collapsing sharply inward, heels lifting, feet sliding, or descending deeper than you can control.
Progress: increase depth, add a pause, slow the lowering phase, or add appropriate resistance once basic control is reliable.
Targets: calves and ankle control.
Setup: Face the wall with light hand support. Keep the feet parallel or in a comfortable natural stance.
Movement: Rise onto the balls of the feet, pause, and lower slowly.
Watch for: rolling the ankles outward or pulling yourself upward with the arms.
Progress: reduce hand support or use a slower lowering phase.
Targets: lateral hip muscles and single-leg stability.
Setup: Stand side-on to the wall with one hand lightly supported. Keep the standing knee soft.
Movement: lift the outside leg a small distance to the side without tipping the torso, then lower under control.
Watch for: leaning away from the wall, turning the toes upward dramatically, or using momentum.
Progress: increase time under tension, reduce support, or add light resistance if appropriate.
Targets: quadriceps, glutes, hips, balance.
Setup: Use the wall with one hand for balance and adopt a comfortable split stance.
Movement: lower both knees through a manageable range, keeping both feet stable, then rise.
Watch for: twisting, an unstable front foot, or using the wall to pull yourself upward.
Progress: increase range or reduce hand support gradually.
Targets: chest, triceps, shoulders, trunk.
Setup: Place hands on the wall and step back until the body forms an incline.
Movement: bend the elbows and bring the chest toward the wall while maintaining a long body line, then press away.
Watch for: hips sagging, chin jutting forward, or shoulders shrugging.
Progress: step farther from the wall or move to a lower stable surface when appropriate.
Targets: trunk, shoulders, whole-body stabilization.
Setup: hands on the wall, feet stepped back, body in a long incline.
Movement: hold the position while maintaining steady breathing and gentle pressure into the wall.
Watch for: sagging hips, excessive rib flare, locked shoulders, or breath-holding.
Progress: increase the incline gradually or extend hold time without sacrificing position.
Targets: glutes, hamstrings, posterior chain, trunk.
Setup: lie on your back with the feet on the wall and knees bent comfortably.
Movement: press through the feet and lift the hips, keeping the ribs controlled. Lower gradually.
Watch for: pushing the hips so high that the movement becomes a lower-back arch or losing even foot pressure.
Progress: slow the lowering phase, adjust leverage, or add a pause at the top.
Targets: quadriceps, glutes, hamstrings, abdominal control.
Setup: lie on your back with one or both feet on the wall. Start with the knees comfortably bent.
Movement: slide or press the feet along the wall, then return without allowing the pelvis to tip uncontrollably.
Watch for: extending farther than you can control, holding the breath, or letting the lower back arch excessively.
Progress: increase range gradually or work one leg at a time when stable.
Targets: abdominal control and hip movement.
Setup: lie on your back with the feet or lower legs using the wall as a reference.
Movement: move one leg away from the wall through a small range while the trunk remains controlled, then return.
Watch for: a sudden change in pelvic position or lower-back arch as the leg moves.
Progress: increase lever length only after you can control a smaller range.
Targets: hamstrings and glutes.
Setup: position the feet to increase hamstring contribution while still maintaining stable wall contact.
Movement: lift the hips without pushing into a painful range, then lower slowly.
Watch for: cramping, uneven pressure, or shifting almost all of the work into the lower back.
Progress: adjust leverage rather than immediately jumping to a single-leg version.
Difficulty is better judged by control demands than by a label on a video. A beginner version usually offers more support, shorter leverage, smaller range, fewer repetitions, and simpler coordination. An intermediate version may reduce support, add unilateral work, lengthen the lever, or increase time under tension.
You are ready to progress when you can maintain breathing, repeat the same range, keep the intended contact points stable, and recover normally. You are not ready to progress simply because the movement no longer feels novel.
Regressions are useful tools, not failures. Use a smaller range, move closer to the wall, shorten the lever, add a sturdy chair, reduce repetitions, or choose a simpler exercise when needed.
Normal muscular effort may include warmth, fatigue, or a controlled burning sensation in the working muscles. It should not be confused with sharp joint pain, radiating pain, new numbness or weakness, significant dizziness, chest pain or pressure, sudden severe shortness of breath, or loss of balance and control.
People with recent injury or surgery, substantial balance problems, clinician-imposed restrictions, persistent unexplained pain, or health conditions that materially affect exercise tolerance may benefit from individualized guidance before following generic routines.
Choose a few movements that match the purpose of your session rather than trying to perform every exercise on the chart. The reference becomes most useful when it helps you select, modify, and progress movements deliberately. For broader exercise planning, continue through Mayobook’s Fitness, Weight Loss & Body Transformation hub.
The wall gives you an external reference for balance, body position, and pressure. That feedback can make it easier to notice when you shift, rotate, or lose contact during a movement.
Moving deliberately gives you time to maintain alignment and muscular tension instead of relying on momentum to finish the repetition.
The ribs, pelvis, and spine stay coordinated while the arms or legs move. This is the organizing role commonly described as core control in Pilates.
Squats, bridges, and leg lifts recruit the glutes, quadriceps, hamstrings, and hip stabilizers while the wall helps you manage balance or leverage.
Steady breathing helps reduce unnecessary bracing and makes it easier to notice when a position has become too demanding to control well.
Difficulty can change by adjusting wall distance, range of motion, tempo, support, or resistance instead of simply adding more repetitions.
A Wall Pilates exercise chart is a quick-reference tool, not a workout prescription. Its job is to help you identify a movement, understand the main target area and wall setup, and recall the most important form cue. Sets, repetitions, weekly frequency, progression and individual modifications still depend on the routine and the person using it.
Use these connected pages for the next step.

New to Wall Pilates? Learn how to set…
Read next
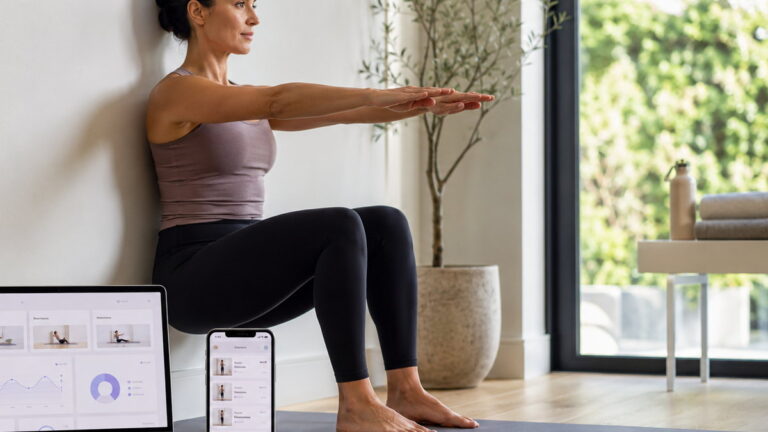
Use the chart as a map, not a mandate. The most useful Wall Pilates exercise is one you can set up safely, perform with controlled breathing and repeatable form, and progress when it genuinely becomes easier. A smaller range or easier variation done well is a better reference point than a more advanced movement you cannot control.